20 วควบคุมที่เหมาะสำหรับROVนี้คือคอนโทรลเลอร์ Playstation 2
ร่าง PS2 Controller สำหรับ ESCs และ Stuff
วันพุธที่ 22 ตุลาคม 2014
ตัวควบคุมที่เหมาะสำหรับROVนี้คือคอนโทรลเลอร์ Playstation 2 ที่มีสาย โชคดีที่พวกเขายังคงทำและมีห้องสมุดสำหรับ Arduino เพื่อพูดคุยกับพวกเขา นอกจากนี้ยังสามารถซื้อซ็อกเก็ตสำหรับคอนโทรลเลอร์ของ PlayStation 2เพื่อเสียบเข้าโดยไม่ต้องทำการปรับเปลี่ยนคอนโทรลเลอร์
ร่างนี้เป็นการพัฒนาเพื่อทดสอบการใช้คอนโทรลเลอร์ Playstation 2 แบบมีสายเพื่อขับชุดเซอร์โวและไฟ LEDs Servos เป็นแบบ stand-ins สำหรับ ESC ที่จะใช้ในความเป็นจริง LEDs ใช้ในการจำลองทริกเกอร์และสถานะของกล้องรวมทั้งทำเป็นไฟหลัก
บทความเกี่ยวกับการใช้ Playstation2 Controllers สำหรับโครงการ Arduino มีอยู่ในส่วน" การใช้ Playstation 2 Controller กับ Arduino Project " ของคุณ
ร่างได้รับการจัดตั้งขึ้นเพื่อง่ายต่อการแบ่งออกเป็นสองส่วน; หนึ่งสำหรับ Arduino ต้นแบบด้านบนและหนึ่งสำหรับ ROV Slave Arduino ที่มีชุดของตัวแปรที่ถูกส่งระหว่างสองเพื่อดำเนินการคำสั่งควบคุม
ในกรณีนี้ Arduino Uno ถูกนำมาใช้
การเข้ารหัสทำให้การใช้ห้องสมุด PS2X ที่พัฒนาโดย Bill Porter ดูwww.billporter.infoสำหรับข้อมูลล่าสุดจาก Bill Porter และดาวน์โหลดไลบรารี ตัวอย่างร่างกับไลบรารีให้การสาธิตที่ดีเยี่ยมเกี่ยวกับรูปแบบต่างๆของการโต้ตอบกับตัวควบคุมและฟังก์ชันต่างๆที่ฉันไม่ทราบ
ความต้องการสำหรับโครงการนี้เกี่ยวกับการอ่านตัวควบคุม PS2 ค่อนข้างง่ายเมื่อเทียบกับวิธีการป้อนข้อมูลที่มีอยู่ ฉันได้ใช้;
*
*
*
*
.Button()ฟังก์ชั่นที่ลงทะเบียนเมื่อมีการกดปุ่มค้างไว้ นี่เป็นประโยชน์สำหรับการควบคุมระดับเสียงของกล้อง *
.ButtonPressed()ฟังก์ชั่นที่เพิ่งลงทะเบียนเมื่อกดปุ่ม แต่ไม่รู้จักเมื่อถือ ซึ่งจะเป็นประโยชน์สำหรับฟังก์ชั่นสลับเช่นการเปิด / ปิดการบันทึกกล้องไฟหลักเปิด / ปิดและปุ่มถ่ายรูป *
.Analog()ฟังก์ชั่นที่ใช้สำหรับอ่านแท่งอะนาล็อก
ชื่อบิลพอร์เตอร์ได้มอบให้กับปุ่มและไม้ทุกแบบเป็นอย่างมากและตัวอย่างร่างด้วยไลบรารี PSX ของเขาใช้ประโยชน์ได้ทั้งหมด แผนผังด้านล่างระบุฉลากที่ใช้โดยไลบรารี PS2X

มีรูปแบบด้านบนด้วย "PSAB" แทน "PSB" สำหรับปุ่มบางปุ่มที่อนุญาตให้ผู้ใช้ป้อนข้อมูลจากปุ่มที่กดได้ยาก ตัวอย่างเช่น PSAB_BLUE วัดความดันที่ใช้กับปุ่ม X นี่เป็นเรื่องที่เจ๋ง แต่ไม่จำเป็นสำหรับความต้องการของโครงการนี้
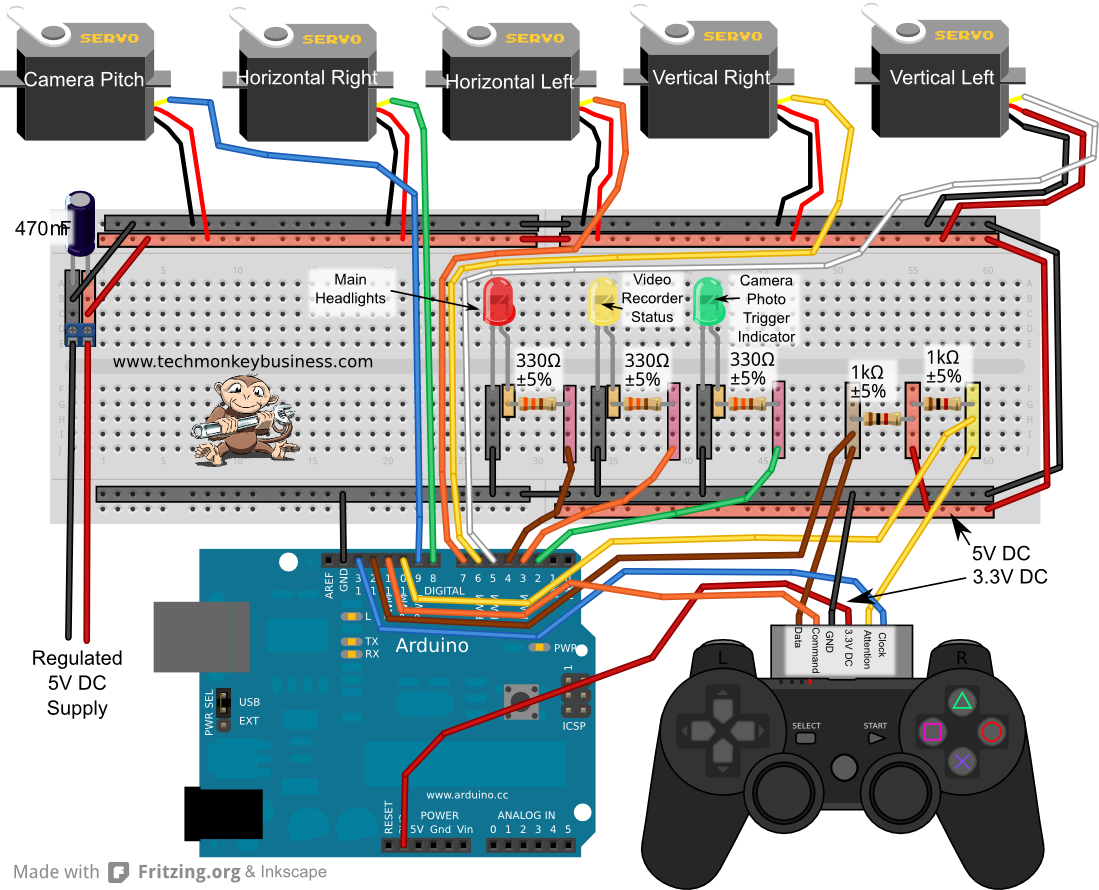
การกำหนดพิน
เอาต์พุต 3.3V ไปที่ PS2 สีแดงขา
ออก 5V ถึง1kΩดึงตัวต้านทานสำหรับ PS2
ปักหมุด D10 ไปยัง PS2 สีเหลืองพิน
D11 ถึง PS2 ขาส้ม
D12 เป็นขา PS สีน้ำตาลขา
D13 ถึง PS2 ขาสีน้ำเงิน
ออก 5V ถึง1kΩดึงตัวต้านทานสำหรับ PS2
ปักหมุด D10 ไปยัง PS2 สีเหลืองพิน
D11 ถึง PS2 ขาส้ม
D12 เป็นขา PS สีน้ำตาลขา
D13 ถึง PS2 ขาสีน้ำเงิน
ตรึง D2 เป็น LED กล้องถ่ายรูป Trigger
Pin D3 ไปยัง LED Indicator ที่บันทึกจากกล้อง
D4 ไปยัง LED Lights หลัก
Pin D3 ไปยัง LED Indicator ที่บันทึกจากกล้อง
D4 ไปยัง LED Lights หลัก
ปักหมุด D5 ไป Servo ขึ้น
ขาซ้ายD6 ไป Servo ขึ้นขวา
Pin D7 ไปยัง Servo Horiz
Pin ซ้ายD8 ไปยัง Servo Horiz ขวา
Pin D9 ไปยัง Servo Cam Pitch
ขาซ้ายD6 ไป Servo ขึ้นขวา
Pin D7 ไปยัง Servo Horiz
Pin ซ้ายD8 ไปยัง Servo Horiz ขวา
Pin D9 ไปยัง Servo Cam Pitch
แหล่งจ่ายไฟ 5V ภายนอกจะให้สายไฟเซอร์โว
การควบคุม ROV
ตัวควบคุมสำหรับ ROV จะเป็น
Left Stick: แกน X = Roll, Y-axis = ขึ้น / ลง
Right Stick: แกน X = Yaw, Y-axis = ไปข้างหน้า / หลัง
ปุ่มทิศทางซ้าย = LED ไฟหลักเปิด / ปิด ปุ่มบังคับ
ทิศทางขึ้น = หมุนกล้องขึ้นไป
ทิศทางปุ่ม pad down = หมุนกล้องลงไป
Triangle = เริ่มต้น / หยุดการบันทึกวิดีโอ
Circle = ถ่ายภาพ
Left Stick: แกน X = Roll, Y-axis = ขึ้น / ลง
Right Stick: แกน X = Yaw, Y-axis = ไปข้างหน้า / หลัง
ปุ่มทิศทางซ้าย = LED ไฟหลักเปิด / ปิด ปุ่มบังคับ
ทิศทางขึ้น = หมุนกล้องขึ้นไป
ทิศทางปุ่ม pad down = หมุนกล้องลงไป
Triangle = เริ่มต้น / หยุดการบันทึกวิดีโอ
Circle = ถ่ายภาพ
วงจรไฟฟ้า
รหัส
คุณสามารถดาวน์โหลดภาพร่างด้านล่างได้ที่นี่: ROVPS2ControlTest1.ino
นอกจากนี้คุณยังสามารถดาวน์โหลดไลบรารี PS2X จากเว็บเพจต่อไปนี้: คอลเล็กชันของห้องสมุด Arduino ที่ใช้ในโครงการนี้
/ *
ROVPS2ControlTest1.ino

ร่างการพัฒนานี้พยายามที่จะจำลองการควบคุม PlayStation 2
ของ ESCs และเซอร์โวของ ROV LED ใช้สำหรับยืน
LED หลักฟังก์ชั่นการบันทึกภาพและการถ่ายภาพ

การกำหนด PIN คือ:

เอาท์พุท 3.3V ไปที่ PS2 สีแดง Pin
5V เอาท์พุทไป 1Kohm ดึงตัวต้านทานสำหรับ PS2
ปักหมุด D10 ไปยัง PS2 สีเหลืองพิน
D11 ถึง PS2 ขาส้ม
D12 เป็นขา PS สีน้ำตาลขา
D13 ถึง PS2 ขาสีน้ำเงิน

ตรึง D2 เป็น LED กล้องถ่ายรูป Trigger
Pin D3 ไปยัง LED Indicator ที่บันทึกจากกล้อง
D4 ไปยัง LED Lights หลัก

ปักหมุด D5 ไป Servo ขึ้น
ขา
ซ้ายD6 ไป Servo ขึ้นขวาPin D7 ไปยัง Servo Horiz
Pin
ซ้ายD8 ไปยัง Servo Horiz ขวาPin D9 ไปยัง Servo Cam Pitch

ปลั๊กไฟภายนอก 5V ให้แรงดันไฟฟ้า Servo Voltage Line

การเข้ารหัสดึงไลบรารี PS2X ที่พัฒนาโดย Bill Porter
ดู www.billporter.info สำหรับข้อมูลล่าสุดจาก Bill Porter และ
ดาวน์โหลดไลบรารี

ในขณะที่การอ่านค่าจากคอนโทรลเลอร์อาจจะตรงไป
ยังคำสั่ง servo ตัวแปรจะถูกใช้เพื่อเก็บค่าเพื่อ
ที่จะจำลองแพคเกจข้อมูลที่จะถูกส่งไปยัง
ROV arduino เหนือซีเรียลในที่สุด

ตัวควบคุมสำหรับ ROV จะเป็น
Left Stick - แกน X = ม้วนแกน Y = ขึ้น / ลง
Right Stick - แกน X = Yaw, Y- แกน = ไปข้างหน้า / หลัง
ปุ่มทิศทาง pad ซ้าย = LED ไฟหลักเปิด / ปิด ปุ่ม
ทิศทางทิศทางขึ้น = หันกล้องขึ้นไป
ปุ่มทิศทาง pad ลง = หมุนกล้องลงไป
Triangle = เริ่มต้น / หยุดการบันทึกวิดีโอ
Circle = ถ่ายภาพ
#include <Servo.h>  //For driving the ESCs and Servos
#include <PS2X_lib.h> // Bill Porter's PS2X Library

PS2X ps2x;  //The PS2 Controller Class
Servo UpLServo;  //Create servo object representing up left ESC
Servo UpRServo;  //Create servo object representing up right ESC
Servo HorizLServo;  //Create servo object representing horiz left ESC
Servo HorizRServo;  //Create servo object representing horiz right ESC
Servo CamServo;  //Create servo object representing camera pitch

const int grnLEDpin = 4;  //green LED is on Digital pin 12
const int redLEDpin = 3;  //red LED is on Digital pin 13.
const int yelLEDpin = 2;  //yellow LED is on Digital pin 2

volatile boolean CamRec;  //Camera record function toggle
volatile boolean LEDHdlts; //LED headlights on/off toggle

int ForwardVal = 0;  //Value read off the PS2 Right Stick up/down.
int YawLeftVal = 0;  //Value read off the PS2 Right Stick left/right
int UpVal = 0; //Value read off the PS2 Left Stick up/down
int RollLeftVal = 0; // Value read off the PS2 Left Stick left/right
int CamPitch = 90; //Angle of the camera servo.

int CamPhotoInd = 0; // a counter for controlling the camera trigger indicator

int upLraw = 0;  //Variables to carry the actual raw data for the ESCs
int upRraw = 0;
int HLraw = 0;
int HRraw = 0;

void setup()
{
  ps2x.config_gamepad(13,11,10,12, false, false);
  //setup pins and settings: GamePad(clock, command, attention, data, Pressures?, Rumble?)
  //We have disabled the pressure sensitivity and rumble in this instance and
  //we know the controller type so we have not bothered with the error checks
  pinMode(grnLEDpin, OUTPUT);  //Sets the grnLEDpin to output
  pinMode(redLEDpin, OUTPUT);  //Sets the redLEDpin to output
  pinMode(yelLEDpin, OUTPUT);  //Sets the yelLEDpin to output.
  CamRec = false;  //Sets the Camera default to not recording
  UpLServo.attach(5);// attaches the Up left Servo to pin 5
  UpRServo.attach(6);// attaches the Up Right Servo to pin 6
  HorizLServo.attach(7);// attaches the Horizontal Left Servo to pin 7
  HorizRServo.attach(8);// attaches the Horizontal Right Servo to pin 8
  CamServo.attach(9); // Attaches the Camera Pitch Servo to pin 9.

}

void loop()
{
  ps2x.read_gamepad(); //This needs to be called at least once a second
                        // to get data from the controller.
  if(ps2x.Button(PSB_PAD_UP))  //Pressed and held
  {
    CamPitch = CamPitch + 1; //increase the camera pitch
  }

  if(ps2x.ButtonPressed(PSB_PAD_LEFT))  //Pressed
  {
    LEDHdlts = !LEDHdlts; //Toggle the LED light flag
  }


  if(ps2x.Button(PSB_PAD_DOWN))  //Pressed and Held
  {
    CamPitch = CamPitch - 1; //increase the camera pitch
  }


  if(ps2x.ButtonPressed(PSB_GREEN))  //Triangle pressed
  {
    CamRec = !CamRec; //Toggle the Camera recording Status
  }

  if(ps2x.ButtonPressed(PSB_RED))  //Circle pressed
  {
    CamPhotoInd = 70;  //Set to indicate photo taken for about 1 second.
  }

//Analogue Stick readings
  ForwardVal = ps2x.Analog(PSS_RY);
  YawLeftVal = ps2x.Analog(PSS_RX);
  UpVal = ps2x.Analog(PSS_LY);
  RollLeftVal = ps2x.Analog(PSS_LX);

//Translate the Stick readings to servo instructions
//This would normally happen in the ROV based on the
//Stick readings sent to it from the topside Arduino
//Over the serial.
//Readings from PS2 Controller Sticks are from 0 to 255
//with the neutral being 128.  The zero positions are to
//the left for X-axis movements and up for Y-axis movements.

//Variables to carry the actual raw data for the ESCs
  upLraw = (128-UpVal)+(128-RollLeftVal)/2;  //This will be up to a value of 192
  upRraw = (128-UpVal)-(128-RollLeftVal)/2;  //This will be up to a value of 192
  HLraw = (128-ForwardVal)+(128-YawLeftVal);  //This will be up to a value of 256
  HRraw = (128-ForwardVal)-(128-YawLeftVal);  //This will be up to a value of 256

//Scale the values to be suitable for ESCs and Servos
  upLraw=map(upLraw,-193,193,0,179);
  upRraw=map(upRraw,-193,198,0,179);
  HLraw=map(HLraw,-256,256,0,179);
  HRraw=map(HRraw,-256,256,0,179);

//Write it to the Servos or ESCs

  UpLServo.write(upLraw);
  UpRServo.write(upRraw);
  HorizLServo.write(HLraw);
  HorizRServo.write(HRraw);

// Signalling that a photo has been taken.

  if(CamPhotoInd >= 1)
  {
    CamPhotoInd = CamPhotoInd - 1; //countdown for the CamIndicator
    digitalWrite(grnLEDpin,HIGH);  //Light the Green LED to indicate phototriggered
  }
  if(CamPhotoInd <= 0)
  {
    digitalWrite(grnLEDpin,LOW);  //Photo event indication over.
  }

  CamPitch = constrain(CamPitch,30,149); //keep CamPitch within the 30 - 149 boundary
  CamServo.write(CamPitch);  //Move the camera servo
  digitalWrite(redLEDpin,CamRec); //Light the redLED based on camera recording status flag
  digitalWrite(yelLEDpin,LEDHdlts); //Light the LED based on headlights status flag
  delay(15);
}


ความคิดเห็น
แสดงความคิดเห็น